ENGAGEMENT SLIDERS
Teacher Training Module 1
Understanding engagement sliders
Within this training module, you will learn about:
- Login
- The Dashboard
- Groups - Creating
- Groups - Viewing and Editing
- Surveys - Creating
- Surveys - Top Tip
- Surveys - Viewing and editing
- Surveys - Viewing and editing as a collaborator
- Sending out a survey with a link
Login
Welcome to the Engagement Sliders app.
To access Sliders go to https://my.sliders.app
You will be prompted to log in.
If you have multiple engagement accounts you will be able to select the relevant account.
The Dashboard
The dashboard has two main navigation areas:
Menu bar at the top of the screen.
- Questionnaires allows you to create a survey and to view all the surveys you have previously created.
- Groups allows you to create groups and view all the groups you have previously created.
Side menu on the left hand side of the screen.
- Filters - The ability to filter survey results by chosen dates, groups, subjects and demographics.
- Responders - The ability to see who has responded to a survey.

Groups - Creating
Surveys can be sent out without assigning them to a group. However a teacher may wish to identify a group, such as a target group, and filter and monitor their responses closely over time.
To set up a group:
- From the top menu select Groups.
- Click on the orange + button at the base of the screen to create a group.
- Enter the title.
- Select the learners by scrolling or typing in their name.
- Create.
Groups - Viewing and Editing
To view or edit an existing group:
- From the top menu select Groups.
- Use the search function to find groups that are not visible on screen.
- To edit a group, select the edit button to amend title, add or delete learners.
To delete a group, select edit button and click on delete.
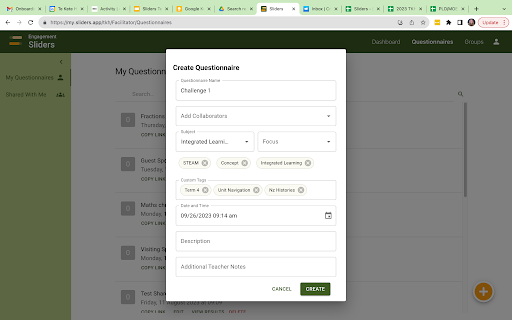
Surveys - Creating
From the top menu select Questionnaires.
- Click on the orange + button at the base of the screen to create a questionnaire.
- Enter Questionnaire Name.
- Add a collaborator(s)
- Enter Subject title and Focus (these can be used later when filtering).
- Use the Custom field to create bespoke tags that do not appear in the Subject of Focus fields
- Add a description. This is visible to the learner and will aid understanding of the survey purpose or teacher’s instruction.
- Add teacher notes.
Surveys - Top Tip
Top Tip: Custom Tags
Take the time to agree or formulate a tagging system for use in sliders.
Having agreed tags that can be used consistently will help with filtering.
Possible tags could be:
Term of delivery, Unit Name, Subjects that are not included in the Subject drop down field
Surveys - Viewing and editing
- From the top menu select Questionnaires. All the surveys you have created will appear.
- Use the Search function to find any surveys not visible.
- To edit a survey select the Edit button and amend fields as necessary.
Surveys - Viewing and editing as a collaborator
- From the top menu select Questionnaires.
- From the left hand side menu choose Shared With Me
- Use the Search function to find any surveys not visible.
- To edit a survey select the Edit button and amend fields as necessary.

Sending out a survey with a link
To share a survey with your class you can share the link.
- From the top menu select Questionnaires and all the surveys you have created will appear.
- Search or locate the relevant survey you wish to send out.
Click on the Copy Link button.
To share this survey with either individual students of groups of students:
- Embed this link in an email.
- Share within a google doc or slide deck.
- Share via Google Classroom, Hāpara or another system.
- Embed within the SchoolTalk Design for Learning page.